
Introduction to Chicken Brining
A perfectly brined chicken transforms any meal, ensuring deep flavor and succulent texture. This Simple Chicken Brine with a Global Twist infuses traditional brining with a fusion of warming spices, giving your poultry an irresistible balance of savory, sweet, and aromatic flavors. Whether roasted, grilled, or fried, this brine enhances the natural taste while keeping the meat juicy and tender.
Table of Contents
Essential Ingredients for Chicken Brine
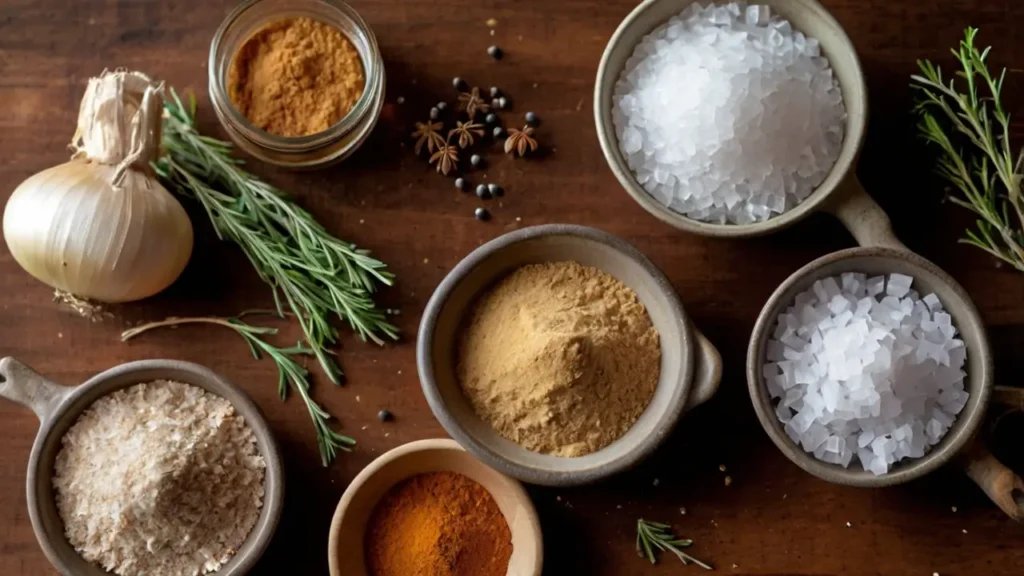
Creating an effective chicken brine requires a careful selection of key ingredients, each playing a vital role in achieving moist and flavorful poultry. The most fundamental component of any brine is salt, which serves to enhance the meat's natural flavors while improving its moisture retention.
There are various types of salt to consider: kosher salt, table salt, and sea salt. Kosher salt is favored for its larger crystals, making it easier to dissolve and distribute evenly. Table salt, while more concentrated, can add a harsher flavor due to anti-caking agents, so it is often used in smaller quantities. Sea salt, derived from evaporated seawater, comes with a range of flavors depending on its origin, adding a subtle complexity to the brine.
Next, sugar is an important ingredient that complements the salt's flavor and contributes to the browning of the chicken during cooking. Both white sugar and brown sugar can be used, with the latter imparting a slight molasses flavor for added depth. Honey and maple syrup are popular alternatives as well, introducing unique taste profiles that enrich the overall brining process.
Beyond salt and sugar, optional flavor enhancers such as herbs, spices, and aromatics can significantly elevate the overall taste. Common ingredients include garlic, onion, peppercorns, bay leaves, and fresh herbs like thyme and rosemary. These additions allow for a personalized touch—perfect for tailoring the brine to complement various culinary styles.
Lastly, the quality of water cannot be overlooked in the chicken brine process. It serves as the foundation for dissolving the ingredients and ensuring even distribution throughout the meat. Using filtered water can eliminate any unwanted flavors and impurities that may affect the brining outcome. Combined, these ingredients form a solid base for an effective chicken brine, ensuring your poultry is both tender and bursting with flavor.
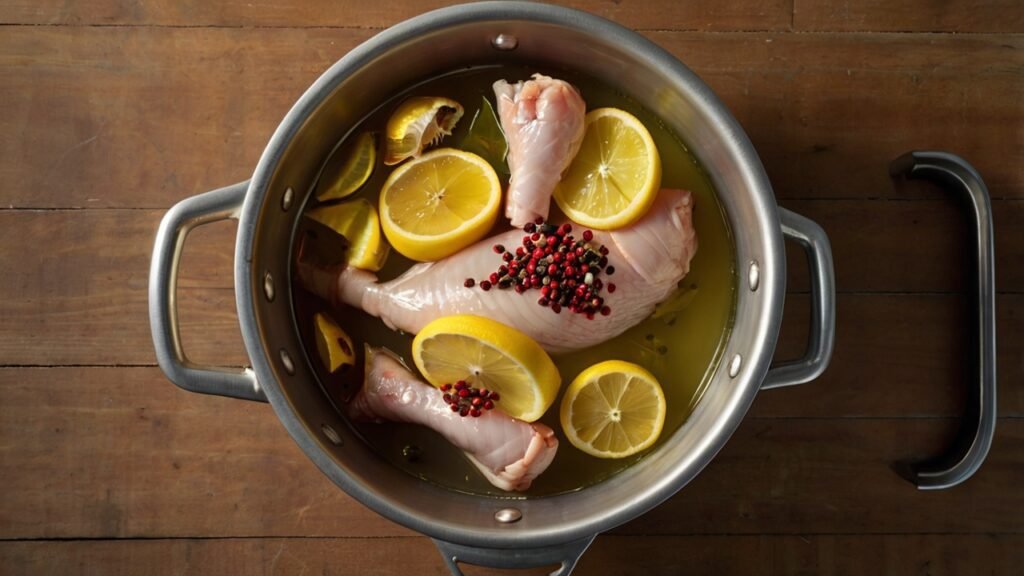
Simple Chicken Brine with a Global Twist
Ingredients
- 8 cups 2 quarts water
- 1/3 cup kosher salt
- 1/4 cup honey
- 1/4 cup brown sugar
- 1 tablespoon black peppercorns
- 1 teaspoon ground ginger
- 1 teaspoon smoked paprika
- 1 teaspoon garlic powder
- 1 teaspoon onion powder
- 2 bay leaves
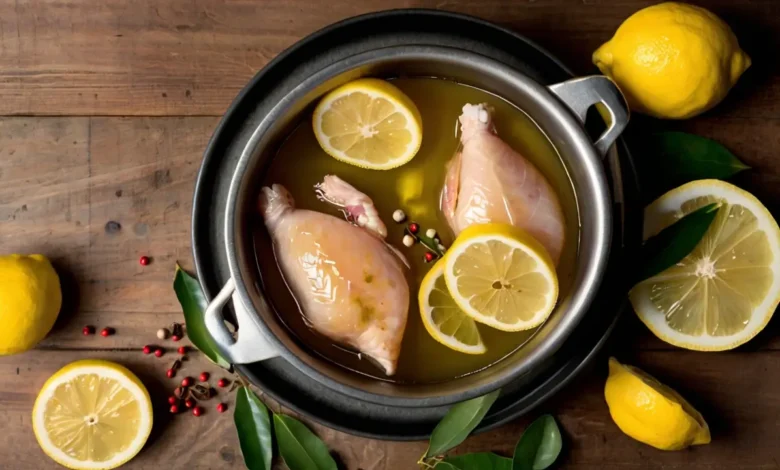
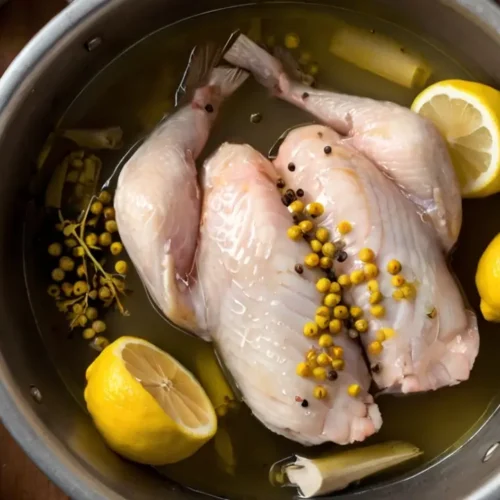
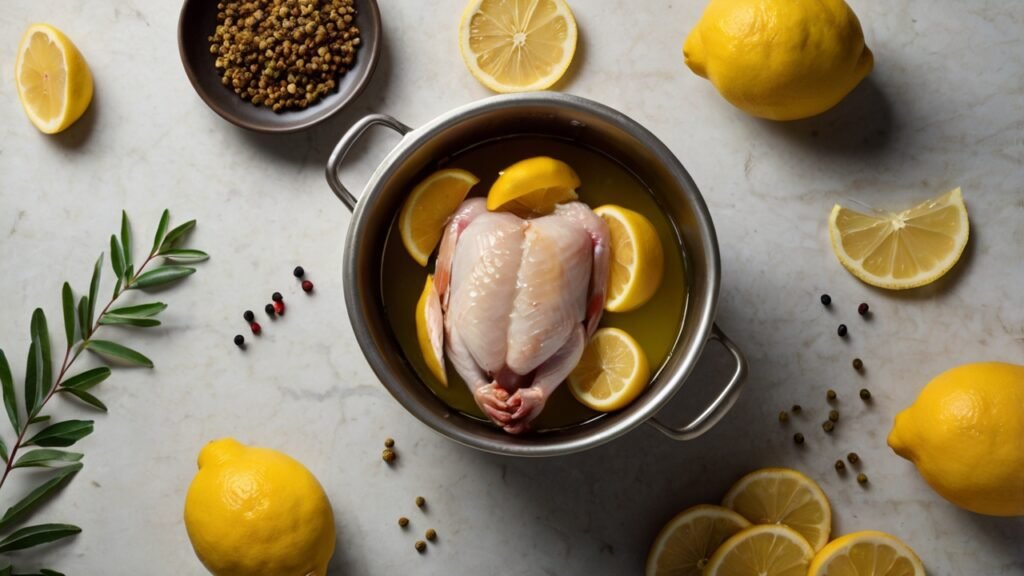
- 1 lemon sliced
- 4 sprigs fresh thyme or 1 teaspoon dried thyme
- 4 cups ice cubes
Instructions
- A large pot is filled with 4 cups of water and placed over medium heat.
- Salt, honey, and brown sugar are stirred into the warm water until fully dissolved.
- Black peppercorns, ginger, smoked paprika, garlic powder, onion powder, bay leaves, lemon slices, and thyme are added, and the mixture is simmered for 5 minutes to infuse flavors.
- The brine is removed from heat, and 4 cups of ice cubes are stirred in to cool it down rapidly.
- The brine is transferred to a large container or resealable bag, ensuring it is completely chilled before adding the chicken.
- The chicken is fully submerged in the brine and refrigerated for 6 to 12 hours.
- The chicken is removed, rinsed under cold water, and patted dry before cooking as desired.
For Chicken Thighs Mushrooms Recipe, imagine tender, juicy chicken thighs bathed in a rich, garlicky mushroom sauce—simple to make yet packed with deep, savory flavors your family will love!
Choosing the Right Brine Ratio
Brining chicken effectively hinges on finding the optimal salt-to-water ratio, which plays a crucial role in enhancing both flavor and texture. The general rule of thumb for a basic chicken brine is to use one cup of kosher salt for every gallon of water. This ratio is typically sufficient to saturate the chicken, allowing the salt to penetrate the meat and improve moisture retention. The resultant flavor profile is noticeably richer, and the chicken ends up juicier after cooking.
However, it's important to recognize that the brine ratio may need adjustments based on the specific cut of chicken being prepared. For example, when brining chicken breasts, a slightly lighter ratio, such as half a cup of kosher salt per gallon of water, may be more appropriate due to their natural tendency to dry out. On the other hand, darker cuts, like thighs or wings, can benefit from a standard concentration as they can more readily absorb flavors and moisture.
In addition to standard ratios, personal taste preferences can also be accommodated. For those who prefer a sweeter flavor, incorporating sugar into the brine can create a delightful balance. A common variation is to use half a cup of sugar combined with the standard cup of kosher salt, enhancing the overall taste.
Furthermore, other flavorings such as herbs, spices, and citrus can be included to modify the brine's impact. Herbs like thyme and rosemary or spices such as peppercorns and garlic can create a more complex flavor profile tailored to particular recipes.
Ultimately, achieving the perfect brine ratio is a matter of experimentation and adjustment. Consider the type of chicken, target flavor profiles, and personal preferences to develop a brine that enhances your culinary endeavors.
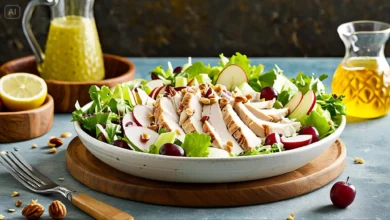
Craving a crunchy, creamy classic? Dive into our timeless Chicken Waldorf Salad—a symphony of crisp apples, juicy grapes, and tender chicken, perfect for picnics or posh lunches. Prefer something bolder? Let’s turn up the heat.
Step-by-Step Brining Process
Brining chicken is a straightforward yet effective technique that enhances flavor and tenderness. To get started, gather the following ingredients: 1 gallon of water, ¾ cup of kosher salt, ½ cup of granulated sugar, and optional aromatics such as garlic cloves, black peppercorns, or fresh herbs like rosemary and thyme. Begin by measuring out the ingredients, ensuring that the kosher salt and the sugar are precise to achieve optimal results.
In a large non-reactive pot, combine the water with the kosher salt and sugar. Stir the mixture over medium heat until the salt and sugar are completely dissolved. This step is crucial as it ensures that the chicken absorbs the brine uniformly. Should you choose to incorporate aromatics, add them to the pot at this stage for an enhanced flavor profile. Allow the brine to cool to room temperature before proceeding.
Once the brine has cooled, it’s time to prepare the chicken. If your chicken is whole, make sure to remove any giblets from the cavity. For other cuts, such as breasts, thighs, or legs, it is beneficial to score the surface lightly. This process increases the surface area that contacts the brine, leading to improved flavor absorption.
Next, place the chicken into a large resealable plastic bag or a food-safe container. Pour the cooled brine over the chicken, ensuring that it is fully submerged. If using a bag, expel as much air as possible before sealing securely. If using a container, cover it tightly with a lid. Refrigerate the chicken in the brine for a minimum of 4 hours, though overnight is recommended for larger cuts or whole birds. This step is vital for achieving the desired juiciness and flavor.
For Chicken Cutlets in Air Fryer, enjoy crispy, golden perfection with every bite! These air-fried cutlets are crunchy outside, juicy inside, and ready in minutes—a quick, healthy twist on a classic favorite!
Brining Times for Different Chicken Cuts
Brining chicken is a popular technique for enhancing flavor and moisture, but the time required for effective brining can vary significantly depending on the cut of meat. Understanding the appropriate brining times for different chicken cuts is essential for achieving optimal results.
For a whole chicken, brining is generally recommended for approximately 12 to 24 hours. The size and weight of the chicken play a crucial role in this timeframe. A larger bird may benefit from the full 24-hour brining process to ensure the salt solution penetrates evenly throughout the meat, while smaller chickens can be satisfactorily brined in the shorter range. An ideal brine will consist of salt, sugar, and various herbs and spices, enhancing both flavor and moisture retention.
Chicken breasts, being relatively thick, require less time in the brine. A brining period of 30 minutes to 2 hours is typically sufficient. Since chicken breasts are leaner compared to other cuts, they can become overly salty if brined for extended periods. Thus, monitoring the time to avoid overpowering the chicken's natural flavor is crucial.
For chicken thighs, which are thicker and generally have a higher fat content, a brining time of 1 to 4 hours is ideal. The additional fat present in the thighs allows for extended brining without sacrificing flavor. Apart from enhancing taste, the brining process helps to break down proteins, ensuring the meat remains tender and juicy during cooking.
Lastly, chicken wings require the shortest brining period, generally 30 minutes to 1 hour. Due to their smaller size and thinner meat, the wings benefit from quick brining, imparting flavor without overwhelming their delicate texture. Each chicken cut has its own ideal brining time that should be adhered to for the best culinary results.
Ready to elevate your plate? Our Cava Chicken Recipe marries zesty citrus, smoky paprika, and a splash of Spanish flair for a dish that’s as vibrant as it is satisfying. Need a lighter bite? Keep scrolling for a fresh twist…
Rinsing and Drying the Chicken After Brining
After the brining process is complete, it is essential to rinse the chicken thoroughly to remove any excess salt that may have settled on its surface. This step is crucial because unwashed chicken can lead to an overly salty flavor, detracting from the intended taste of your dish.
Rinsing the chicken under cold running water for a few minutes ensures that you effectively eliminate any residual brine. Additionally, this practice helps restore the natural flavor of the chicken, enhancing the overall taste profile once cooked.
Following this rinsing process, drying the chicken is an equally important step, particularly for those seeking crispy skin once the chicken is prepared. After rinsing, pat the chicken dry using paper towels. This method helps in removing moisture that can prevent the skin from crisping up during cooking. It is advisable to avoid over-saturating the chicken with water as excess moisture can lead to steaming rather than searing, which compromises the desirable crispy texture.
For a more effective drying process, consider letting the chicken sit uncovered in the refrigerator for a short period. This method allows the skin to dry further, promoting better browning when the chicken is eventually cooked.
Another useful technique involves air-drying by placing the chicken on a wire rack to facilitate airflow on all sides. This process not only prepares the chicken for cooking but also ensures that it is not over-salted. By adhering to these practices of rinsing and drying, one can guarantee that the brined chicken achieves a well-balanced flavor and a delightful texture when cooked.
Cooking Chicken Post-Brine
Once the chicken has undergone the brining process, it is prepared to be cooked using various methods that enhance its flavor and tenderness. Brined chicken can be grilled, baked, or fried, with each technique offering its own unique characteristics and results. Understanding how brining affects the cooking process is crucial for achieving optimal outcomes.
When grilling brined chicken, it is essential to preheat the grill to a medium-high temperature. The excess moisture retained from the brining process allows the chicken to stay juicy, but it is important to avoid flare-ups from drippings.
A light coating of oil on the grill grates can help prevent sticking and promote even cooking. The recommended cooking time may be reduced slightly due to the moisture content, so monitoring the internal temperature is key; it should reach at least 165°F (74°C) for safe consumption.
Baking is another preferred method for cooking chicken post-brine. Preheating the oven to 375°F (190°C) will provide an ideal environment for thorough cooking. Brined chicken may need less seasoning due to the salt absorbed during the brining. It is advisable to place the chicken on a rack over a baking sheet to allow air circulation, resulting in a crisp exterior. Cooking times can vary depending on the cut of chicken and its size, so ensure an accurate cooking thermometer is used.
Frying brined chicken offers a delightful crunch and a unique depth of flavor. To achieve this, use a deep pot or skillet with sufficient oil heated to 350°F (175°C). The brining process helps lock in moisture, meaning that brined chicken may require a minimal reduction in cooking time compared to non-brined options. Additionally, consider incorporating complementary marinades or seasonings after brining to elevate the dish further while retaining the unique benefits of the brine.
Tools for This Recipe
- Large pot
- Measuring cups and spoons
- Stirring spoon
- Sharp knife (for slicing lemon)
- Large container or resealable bag
- Refrigerator
Storing and Using Leftover Brine
Once the brining process is complete, many cooks find themselves with leftover brine that could be utilized in future culinary endeavors. First and foremost, it is essential to prioritize food safety when handling leftover brine. Proper storage is critical; therefore, any uneaten brine should be transferred to an airtight container and refrigerated promptly.
Typically, leftover brine can be stored in the refrigerator for up to a week. If you don't plan to use it within this timeframe, freezing is an excellent option. Place the brine in freezer-safe containers, leaving some space for expansion as it freezes, and it can last for several months. Take care to label the containers with the date of storage for easy tracking.
While utilizing leftover brine, it is worth noting that food safety guidelines suggest assessing it for signs of spoilage, including an off smell or any discoloration before reuse. If properly stored and used promptly, leftover brine can also find new life in various culinary applications.
For instance, it can be repurposed for marinating other proteins, such as pork or fish, allowing them to absorb similar flavors. Additionally, leftover brine can serve as a base for salad dressings or sauces, enhancing the overall taste profile of your dishes.
For those who embrace sustainability in their cooking practices, reusing brine is an excellent way to minimize waste while adding depth to new recipes. Incorporating brine into a pickle recipe or as a braising liquid can create unique flavors and enhance meals significantly. Thus, not only does storing and reusing your brine contribute to food safety, but it also fosters a more sustainable cooking approach that encourages thoughtful use of ingredients.
Want to lighten things up without sacrificing flavor? These Chicken Spring Roll Bowls pack all the bright, herb-packed punch of your favorite takeout—minus the wrapper! Craving more comfort? Circle back to our creamy crowd-pleasers
Common Mistakes to Avoid When Brining Chicken
Brining chicken is an essential technique that can significantly improve its flavor and juiciness. However, there are several common mistakes that both novice and experienced cooks may encounter while undertaking this culinary task. Recognizing these pitfalls is crucial for successful brining.
One frequent error is using improper ingredient ratios. An inadequate balance of salt to water can result in chicken that is either under-seasoned or overly salty. Generally, a good rule of thumb is to use one cup of kosher salt for every gallon of water.
This ratio ensures that the chicken absorbs enough flavor without becoming unpalatable. Additionally, it is important to differentiate between types of salt, as their volume equivalents vary. For instance, table salt and kosher salt cannot be interchangeably measured due to their differing grain sizes. When using table salt, it’s advisable to reduce the quantity, as it can lead to excessive salinity in the brine.
Another common mistake is poor brining duration. Brining chicken for too short a period may not allow enough time for the flavors to permeate the meat, while overly extended brining can lead to a mushy texture due to too much moisture absorption. As a general guideline, chicken breasts should be brined for about 1 to 2 hours, while whole chickens may require 4 to 12 hours, depending on their size.
Finally, disregarding temperature control can jeopardize the brining process. It is crucial to ensure that the brine solution is cooled before adding it to the chicken. Placing meat in a hot brine can lead to uneven cooking and compromise food safety. After brining, always pat the chicken dry before cooking to achieve a crispy exterior. By being mindful of these common mistakes, cooks can enhance their brining endeavors and achieve optimal results.
FAQ
Can I brine frozen chicken?
Yes, but thaw it first in the fridge. Brining frozen chicken won’t penetrate evenly, and it risks staying in the “danger zone” temperature too long.
What if I don’t have time to wet-brine?
Try a dry brine! Rub chicken with salt (and seasonings) and let it sit uncovered in the fridge for 1–24 hours. It draws out moisture, then reabsorbs it for juicy meat.
Does brining make chicken salty?
Properly brined chicken should taste seasoned, not overly salty. Rinse the chicken after brining and pat dry before cooking. For low-sodium diets, reduce salt by half or use a dry brine.
Can I brine chicken for soup or stock?
Skip it—the brine’s salt will over-season the broth. Brining is best for whole cuts you plan to roast, grill, or fry.

